Author Archives: James Coyle

Docker Compose File For Watchtower

Get Social!

Watchtower is a docker container that will update the version of other running containers. You can change the environment settings as required for your installation – see the full documentation for more info.

version: '3'

services:
  watchtower:
    image: containrrr/watchtower
    restart: always
    volumes:
      - /var/run/docker.sock:/var/run/docker.sock
      - /etc/timezone:/etc/timezone:ro
    environment:
      - WATCHTOWER_CLEANUP=true
      - WATCHTOWER_LABEL_ENABLE=true
      - WATCHTOWER_INCLUDE_RESTARTING=true
    labels:
      - "com.centurylinklabs.watchtower.enable=true"

Create a new directory and save the above file inside it as docker-compose.yml.

mkdir watchtower
cd watchtower
vi docker-compose.yml

Run docker-compose up -d to fetch the image from the docker hub and create your Watchtower instance. By default, Watchtower will check for updates every 24 hours from the moment you start the Watchtower container. You’ll now need to add labels to your docker containers that you’d like to update which is described below.

Update Containers

The above docker-compose file will get Watchtower up and running but in it’s current state it won’t update any of your existing docker containers. The above docker-compose file is safe by default so that it won’t do anything other than update itself – arguably useless, but safe!

To update your other docker containers you need to add a label to their docker-compose file that sets com.centurylinklabs.watchtower.enable=true. Watchtower will then pick up that label and know that it needs to include that docker container (or service) in it’s updates.

The below is a random docker-compose file that I use to run a database for development work. I’ve added a labels attribute and set the parameter that Watchtower looks for when running it’s update routine. For your containers to be included in Watchtowers update routine you’ll need to add the same labels attribute to ALL of your docker-compose services, just like in the below example – its a simple copy and paste.

version: '3.6'

services:
    db1:
        image: mysql:5.7
        restart: unless-stopped
        volumes:
          - ./data/mysql:/var/lib/mysql
          - ./config/mysql/conf.d:/etc/mysql/conf.d
        
        environment:
            MYSQL_ROOT_PASSWORD: password
            MYSQL_DATABASE: db1
            MYSQL_USER: db1
            MYSQL_PASSWORD: password
        labels:
            - "com.centurylinklabs.watchtower.enable=true"

Once you’ve added the labels attribute, simply wait for a new image to be released and within 24 hours your container will have been updated, restarted and the old image removed (as long as it’s not used elsewhere).
Bash Script To Get AWS EC2 Tag Value For A Running Instance

Tags :

Category : How-to

Get Social!

Here is a Bash script for getting a tag value from within a running EC2 Instance.

For more information on AWS EC2, please see: https://aws.amazon.com/ec2/

If you’re using one of the standard AWS EC2 images, such as Ubuntu, then you’ll have everything you need already installed. Thankfully, Amazon installs some tooling on your host that’ll help you interact with the AWS fabric.

Create a bash file with your favourite text editor.

vi get-tag.sh

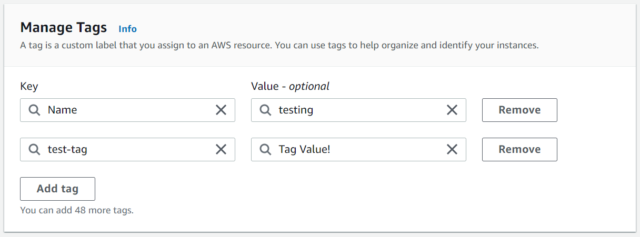
Paste the following script into the bash file. You’ll need to change test-tag in the below script to the tag Key name you’ve defined for the EC2 instance.

TAG_NAME=tag-name
INSTANCE_ID=$(ec2metadata --instance-id)
REGION=$(ec2metadata --availability-zone | sed 's/.$//')
TAG_VALUE=$(aws ec2 describe-tags --filters "Name=resource-id,Values=$INSTANCE_ID" "Name=key,Values=$TAG_NAME" --region=$REGION --output=text | cut -f5)

The value of the tag is now available to use in the variable $TAG_VALUE. Add an echo to the end of your script for now to see it in action.

echo $TAG_VALUE

Make the file executable and run it to see the output.

chmod +x get-tag.sh
./get-tag.sh

Tag Value!

Parallel Replication In MariaDB

Get Social!

Parallel replication has been available in MariaDB since Version 10.0.5, however requires at least version 10.0.5 on both the Master and Slave for parallel replication to work.

Parallel replication can help speed up applying changes to a MariaDB slave server by applying several changes at once.

What is Parallel Replication?

MariaDB replicates data from a master to a slave by shipping all changes that have been applied to the master to the slave in a serialised file. The file is then read by the slave and each change is applied one at a time. A change may be a single row change, such as an INSERT, a DDL change or statement that is applied in it’s entirety such as INSERT INTO… SELECT. The bottle neck to this process is that the changes which need to be applied are read in serial – that is, one at a time.

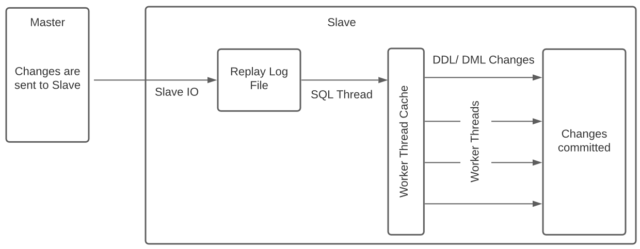
Parallel replication tries to overcome this by applying DML statements in parallel by reading ahead in the relay log (the log on the slave with changes waiting to be applied) and giving work to each parallel worker to apply, in parallel! Each parallel worker has a cache that allows it to read ahead in the log and apply statements that can be applied in parallel – these are usually statements applied in a single transaction, or statements that have been committed in the same group.

The above diagrams show the differences between the different replication mode. Up to the SQL Thread things work in much the same way, however in parallel replication mode the SQL Thread behaves differently in that it moves work to the Worker threads rather than applying it directly itself.

Enable Parallel Replication

You will need MariaDB 10.0.5 or later running on both the master and the slave for parallel replication to be available.

Edit your MariaDB config file, my.cnf on some installations and edit or add the following parameter.

slave-parallel-threads=12

This will enable 12 parallel workers on the database Slave which will be started when your slave server is next restarted and replication is enabled.

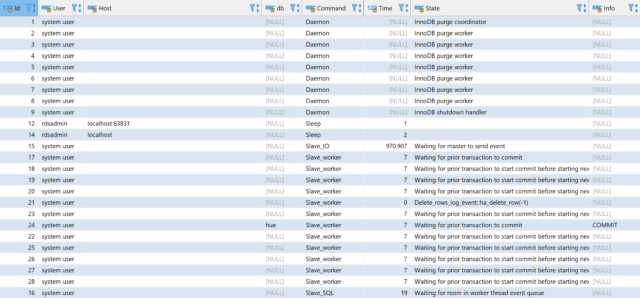
You can see if the required number of workers has been started by running show processlist which will show 12 processes running as system user with various State information.

You can see further information by running show slave status which will show you the replication type, how up to date the replication is and if there are any errors.


Install AWS CodeDeploy Agent on Linux

Category : How-to

Get Social!

AWS CodeDeploy Agent is the agent that runs deploy jobs on EC2 instances. Before a CodeDeploy job will run you’ll need to make sure the agent is installed, running, and has the correct IAM permissions to execute.

For more information on AWS CodeDeploy, please see: https://aws.amazon.com/rds/

Installation is straight forward on Linux and will have your agent up and running in no time.

The below example is based on Ubuntu, but the same steps would be used on other distributions, with the exception of the package manager for installing ruby.

As the root user, run the below commands. root is required because the deployment could be performing actions that require elevated privileges. Ruby is an installation dependency for AWS CodeDeploy and must be available before installing the agent itself.

apt update
apt -y install ruby

Once Ruby is installed we can download and install the CodeDeploy agent. The below agent is being downloaded from the eu-central-1 region, but you can replace the region with your local region if required. Other than saving bandwidth charges for the download (which will be tiny) there is no real reason to do so.

cd /tmp
wget https://aws-codedeploy-eu-central-1.s3.amazonaws.com/latest/install;
chmod +x ./install

./install auto

The final step is to start the agent and check that it’s running. A systemd entry will be added and needs to be called to start the agent.

service codedeploy-agent start

Finally, check that the agent is running by checking the log. You should be looking for a similar output to the below.

tail -f /var/log/aws/codedeploy-agent/codedeploy-agent.log

2019-11-24 07:30:54 INFO  [codedeploy-agent(31022)]: master 31017: Spawned child 1/1
2019-11-24 07:30:54 INFO  [codedeploy-agent(31022)]: On Premises config file does not exist or not readable
2019-11-24 07:30:54 INFO  [codedeploy-agent(31022)]: InstanceAgent::Plugins::CodeDeployPlugin::CommandExecutor: Archives to retain is: 5}
2019-11-24 07:30:54 INFO  [codedeploy-agent(31022)]: Version file found in /opt/codedeploy-agent/.version with agent version OFFICIAL_1.0-1.1597_deb.
2019-11-24 07:30:54 INFO  [codedeploy-agent(31017)]: Started master 31017 with 1 children
2019-11-24 07:31:54 INFO  [codedeploy-agent(31022)]: [Aws::CodeDeployCommand::Client 200 61.547075 0 retries] poll_host_command(host_identifier:"xxxx")

See here for the installation steps combined into a single script.


Script To Install AWS CodeDeploy Agent on Linux

Get Social!

Here is the script for installing the AWS CodeDeploy agent on Ubuntu. See the full description here.

For more information on AWS CodeDeploy, please see: https://aws.amazon.com/codedeploy/

apt update
apt -y install ruby

cd /tmp
wget https://aws-codedeploy-eu-central-1.s3.amazonaws.com/latest/install;
chmod +x ./install

./install auto

service codedeploy-agent start

Storj Storage Node Docker-Compose file

Get Social!

Storj V3 is now in BETA and recruiting Storage Node operators. Since V3 of Storj, Docker is used exclusively to wrap up creating a new Storage Node into a simple, manageable container.

You’ll need to see the official docs for creating your identity certificates, but when it comes to creating your docker environment it couldn’t be more simple than using docker-compose. If you haven’t got docker-compose installed then check out this blog post.

Create a new folder and a docker-compose.yml with the below content.

mkdir storj
vi storj/docker-compose.yml
version: '3'
services:
  storagenode:
    image: storjlabs/storagenode:beta
    restart: unless-stopped
    ports:
        - 28967:28967
    volumes:
        - ./config/identity:/app/identity
        - ./data:/app/config
    environment:
        - WALLET=0x123456789
        - EMAIL=EMAIL
        - ADDRESS=external.url:28967
        - BANDWIDTH=10TB
        - STORAGE=1TB
        - STORJ_LOG_LEVEL=info
  watchtower:
    image: containrrr/watchtower
    volumes:
        - /var/run/docker.sock:/var/run/docker.sock
    environment:
        - WATCHTOWER_CLEANUP=true

You’ll need to fill out the environment details to match your requirements, especially the WALLET and ADDRESS. You may want to redirect the volume elements to match your environment – the /app/config path should point to the disk that you’d like to use for storage (I know, the name is confusing) and the /app/identity path should point to your Storj identity certificates.

Run docker-compose up -d to fetch the images from the docker hub and create your Storage Node instance.


Visit our advertisers

Quick Poll

Do you use GlusterFS in your workplace?

Visit our advertisers