OBIEE With Essbase as a Data Source Using SSO

OBIEE With Essbase as a Data Source Using SSO

Get Social!

oracle-biThere are various ways to integrate OBIEE and Essbase when using SSO, each with their own security specifics and implementation difficulty. The three main ways of SSO authentication between OBIEE and Essbase are:

  1. Username and password pass-through – this passes the user name and user password through to the Essbase server with each request. This will not work with some OBIEE Authentication methods such as SAML SSO Authentication due to the fact that the OBIEE server never knows the user password.
  2. CSS Token authentication – This is not recommended any more due to the difficulty in setting it up. This process differers depending on the version of Essbase used.
  3. User Impersonation – this uses an Essbase Admin user (or user with the required permission) for the connection between OBIEE and Essbase however when data is requested, the username is passed to the Essbase server as part of the EssLoginAs function. This function is similar to using su – username in Linux as it assumes the username‘s status despite who initially connected.

Option 1 doesn’t work in all scenarios, such as when OBIEE authentication is done using SAML SSO – so that rules out option 1. Oracle no longer recommends using the CSS Token method due to the complexity involved in setting it up – so that removes option 2 from the pool.

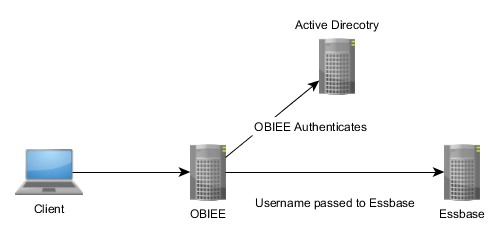
Option 3 is the new, recommended method of connecting OBIEE to an Essbase data source using single sign on. The client authenticates with OBIEE using the Authentication Provider, in this case Active Directory, and then sends the username to the Essbase server to run all further commands (such as ‘give me some data’) as if it were the user running them.

obiee_essbase

Setting this up is very easy. You need an Essbase user that has permission to run EssLoginAs , such as any admin user. Once you have that, enter that users credentials into the Connection Pool’s User name and Password fields under Shared logon and tick the SSO check box.  And that’s it – you’re good to go!
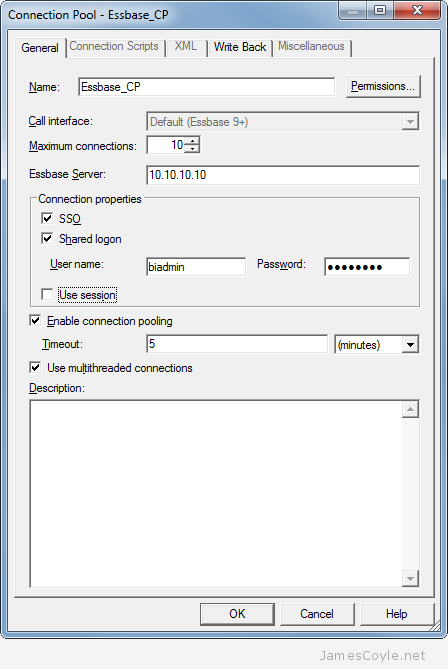
Connection Pool - Essbase_CP

It’s worth noting that if you look at Sessions in the EAS Console you’ll only see the Admin user name and not the user being impersonated. It can be a bit misleading, but you’ll see something similar to the below in the Essbase logs:

[Thu Jun 18 20:18:12 2015]Local/ESSBASE0///Info(1051529)
Logging in user [essbaseadmin] with security privileges of user [james]

This shows the initial user that is in your Connection Pool, essbaseadmin, and the user being impersonated, james.


Apache Active Directory Group Authentication

Get Social!

apache-logoThe Apache HTTP server can be used with LDAP or Microsoft’s Active Directory to authenticate users before viewing a webpage or site.
Before getting started, you will need to have the required Apache mods installed. Run the following command to enable the required LDAP mods.

a2enmod ldap authnz_ldap

The LDAP configuration generally goes in the Location tags, as per the below example.

<Location />
        Order allow,deny
        Allow from all
	AuthzLDAPAuthoritative on
	AuthLDAPBindDN "CN=ldapservice,CN=Users,DC=jamescoyle,DC=net"
	AuthLDAPBindPassword "mypassword"
	AuthLDAPURL "ldap://jamescoyle.net/OU=Users,DC=jamescoyle,DC=net?sAMAccountName?sub?(objectClass=*)"
	AuthType Basic
	AuthName "JamesCoyle.net Authentication"
	AuthBasicProvider ldap
	AuthLDAPGroupAttributeIsDN on
	AuthLDAPGroupAttribute member
	Require ldap-group CN=mygroup,OU=Groups,DC=jamescoyle,DC=net
</Location>

Lets break down each attribute in the above config:

  • AuthzLDAPAuthoritative specifies to Apache that LDAP/ Active Directory authentication should override any other form of authentication.
  • AuthLDAPBindDN is the user DN which Apache will bind to when connecting to your LDAP/ Active Directory server.
  • AuthLDAPURL is the LDAP/ Active Directory URL which specifies your LDAP/ Active Directory server, the location where the users are stored within the directory and the attributes which will be used as a username when authenticating.
  • AuthType is the type of authentication which will be used. Basic gives us the dialogue box to enter our credentials.
  • AuthName is the text which will appear in the login dialogue box. This can differ depending on the web browser.
  • AuthBasicProvider specifies that we will use LDAP as the authentication mechanism.
  • AuthLDAPGroupAttributeIsDN when set to ON this option specifies to use the DN of the user when checking for group permissions in the LDAP/ Active Directory server. Otherwise the username will be used, in this example sAMAccountName.
  • AuthLDAPGroupAttribute is the attribute in the LDAP/ Active Directory server which is used to check for group membership.
  • Require when set to ldap-group indicates to Apache that the user must be in the specified group to allow access.

Setup Active Directory Authentication in Proxmox 2

Category : How-to

Get Social!

Proxmox 2 makes setting up AD authentication simple if you have the AD server names. AD only provides the authentication and does not import or automatically create each user. You will still need to add each user to Proxmox before they can login.

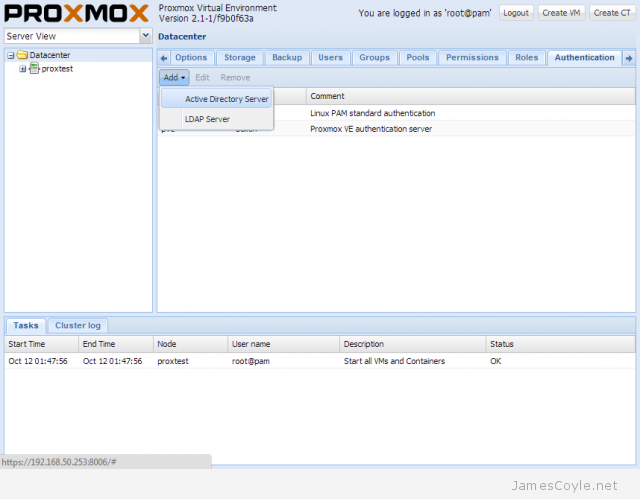
Click on the Datacenter folder on the left hand side and click Authentication. Click Add and then Active Directory Server.

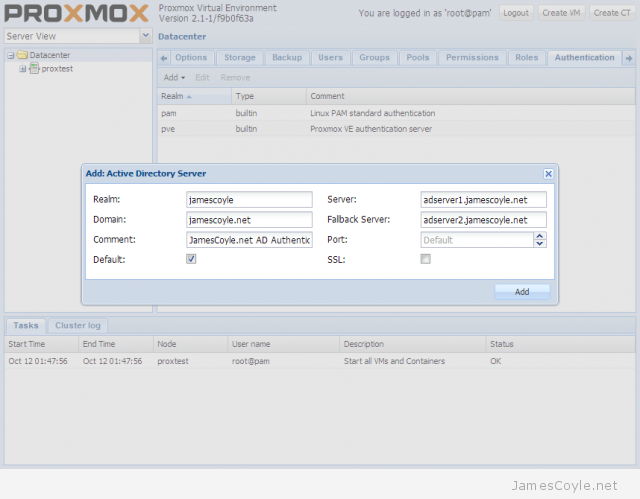
Enter the following details into the Add: Active Directory Server dialogue box and click Add.

  • Realm: the name to use for this authentication server.
  • Domain: AD domain name which holds the users which will be used for authentication.
  • Comment: optional attribute – note this will show up on the main login dialogue box.
  • Default: tick to make this the default authentication method.
  • Server: AD server IP or hostname
  • Fallback Server: secondary AD server IP or hostname
  • Port: keep as Default unless your AD server port has changed.
  • SSL: keep unticked unless you require SSL communication to the AD server.

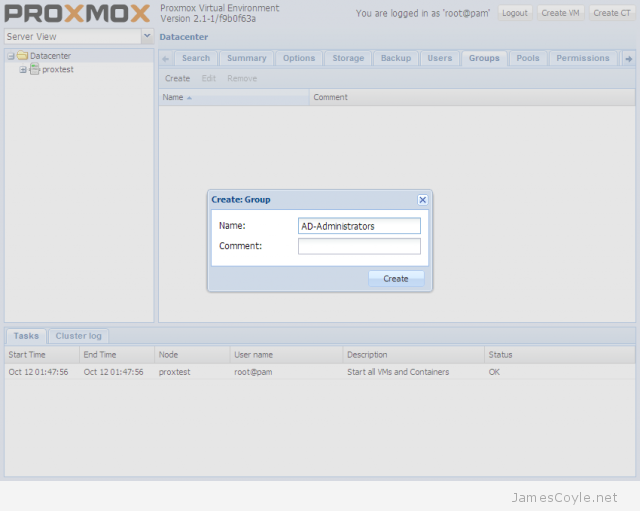
Click the Groups tab and then Create to create a new group on your proxmox server for your AD users. Enter a Name for this group and click Create.

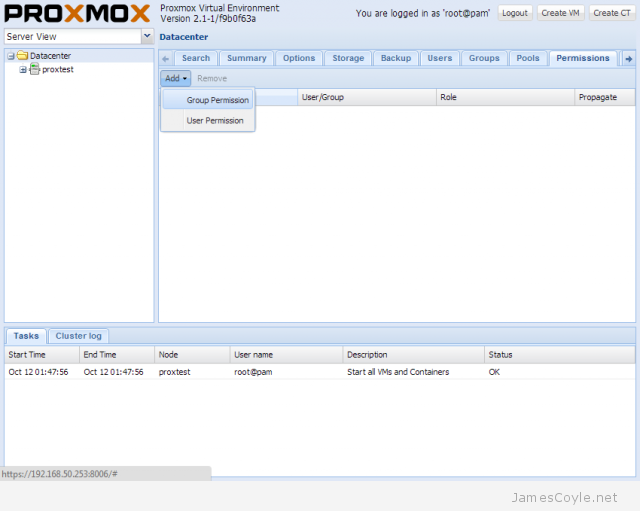
Click the Permissions tab, then click Add and Group Permission.

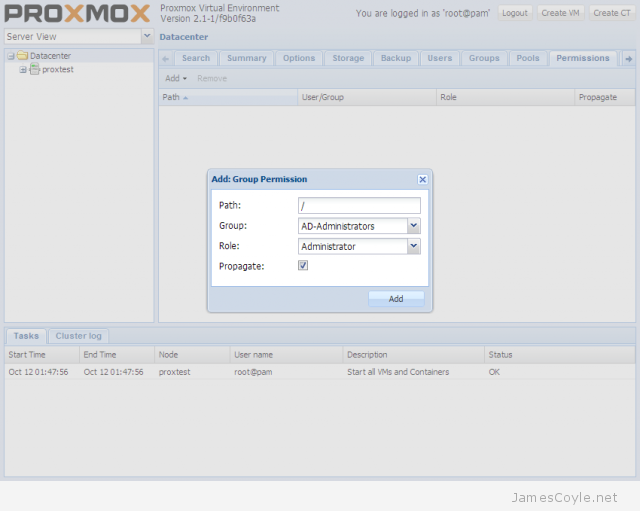
Enter the settings as per below and click Add.

  • Path: the path on the server tree which this group can access. ‘/’ is the top of the hierarchy and can therefore access the full server.
  • Group: the group you created in the previous step.
  • Role: the role, or access level users of this group will have.
  • Propagate: use these permissions for any child objects.

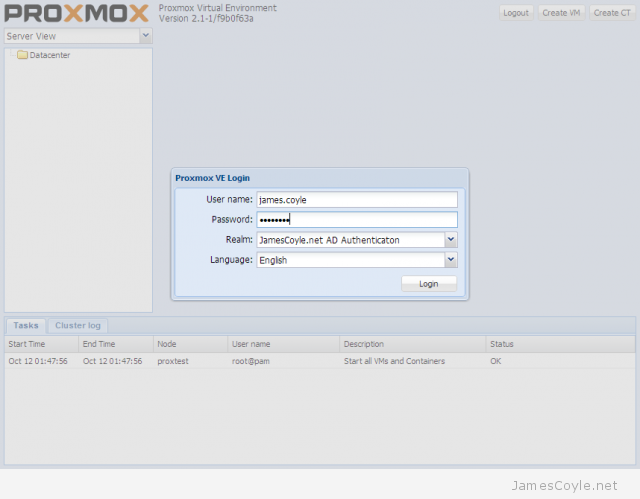
You can now Logout and log back in as an Active Directory user. Make sure your Realm is set to the Realm you created in the first steps of this tutorial.

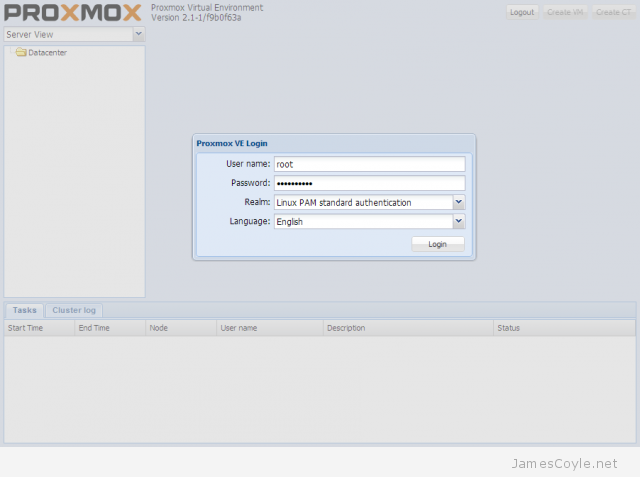
If you need to log back in without AD, set your login Realm to Linux PAM standard authentication.


Visit our advertisers

Quick Poll

How many Proxmox servers do you work with?

Visit our advertisers