Move Proxmox Container to Different Storage (Updated for LXC)

Move Proxmox Container to Different Storage (Updated for LXC)

Get Social!

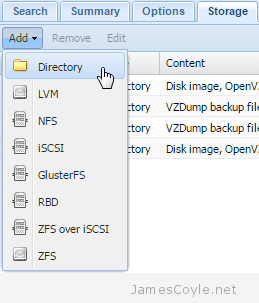
2015-03-05 00_18_04-Proxmox Virtual Environment storageThe Proxmox Web GUI does not give us the ability to migrate a container from one storage device to another directly. To move a container onto different storage we have to take a backup of the container and restore it to the same ID with a different storage device specified. This can be time laborious when working with several containers.

This is an update to the OpenVZ script found here.

The below script allows you to move an LXC container from one storage device to another. The process requires that the container be stopped, which the script will handle.

Save the below script into a file called migrate.

vi migrate
#!/bin/bash
#
# Filename : migrate
# Description : Migrate Proxmox OpenVZ container from one storage to another
# Author : James Coyle
#
# Version:
# -Date       -Author      -Description
# 20-11-2013  James Coyle  Initial
# 13-12-2017  James Coyle  Changes for LXC
#
#

# Variables
TMP=/tmp      #Location to use to create the backup for transferring to new storage. This needs to be big enough to store the backup archive for the container.

# Do not edit
usage() { 
	echo "Usage: $0" 
	echo "          [-c Required: Container ID to migrate <int>] "
	echo "          [-s Required: Target storage ID <string>]"
	echo "          [-d Optional: Delete the backup file after CT restoration <boolean>]"
	echo ""
	echo "Example: $0 -c 100 -s nasarray"
	echo ""
	exit 1; 
}

while getopts "c:s:d" o; do
  case "${o}" in
    c)
      CT=${OPTARG}
      ;;
    s)
      TARGET_STORAGE=${OPTARG}
      ;;
    d)
      DELETE=true
      ;;
    *)
      usage
      ;;
    esac
done
shift $((OPTIND-1))

# Check mandatory fields
if [ -z "${CT}" ] || [ -z "${TARGET_STORAGE}" ]; then
  usage
fi

RUNNING=false

set -e
set -o pipefail

echo "Moving $CT to $TARGET_STORAGE..."
if pct list| fgrep -w -q "$CT" | grep "running"
then
    RUNNING=true
fi

if $RUNNING
then
    pct stop $CT
fi

vzdump --dumpdir $TMP $CT

ARCHIVE=$(ls -t $TMP/vzdump-lxc-$CT-*.tar | head -n 1)

pct restore $CT $ARCHIVE -force -storage $TARGET_STORAGE

if $RUNNING
then
    pct start $CT
fi

if $DELETE
then
    LOG=$(ls -t $TMP/vzdump-lxc-$CT-*.log | head -n 1)
    echo "Deleting $LOG and $ARCHIVE"
    rm -rf $ARCHIVE $TMP/$LOG
fi

Set execution permissions on the script:

chmod + x migrate

The script has several parameters which are detailed below:

  • -d is specified if you would like the script to delete the temporary backup after the process has completed. Leave this out if you would like the backup tar file to be kept, just in case anything goes wrong.
  • -s is required to specify the name of the target storage. You can find this from the Proxmox Web GUI.
  • -c is required for the container ID to migrate.

In addition, the script contains the variable TMP. This will be the location of the backup tar created as part of the migration process and must contain enough space to store the content of the container being migrated. You can change this to suit your environment.

Example command:

./migrate -d -s newstorage -c 101


Scripted Install of Oracle Java 8 on Ubuntu 16.04

Get Social!

Please see Install Oracle Java In Debian/ Ubuntu using apt-get for more information.

apt install -y software-properties-common
apt-add-repository -y ppa:webupd8team/java
apt update
echo oracle-java8-installer shared/accepted-oracle-license-v1-1 select true | /usr/bin/debconf-set-selections
apt install -y oracle-java8-installer


Start/ Stop Container Using The Proxmox Web API in Bash

Category : How-to

Get Social!

The Proxmox Web API can perform any actions available in the front end Web. By implementing a REST API, all commands have been exposed and can be used programatically.

In this example we’ll use Bash to call the Proxmox Web API with our authentication token to start and stop an existing LXC Container.

See this post for an introduction to the Proxmox Web API, including all available API commands.

To issue API requests you’ll need to ensure you have already generated an authentication ticket which is described in Parse Proxmox Web API authentication ticket and the CSRFPreventionToken in Bash.

Once you have the authentication ticket you’ll need to call the Proxmox API using curl and parse the result. Use the below scripts and substitute the values as required:

Start an LXC Container

  • TICKET is the authentication ticket that was produced in the Parse Proxmox Web API authentication ticket and the CSRFPreventionToken in Bash post. Ideally you would programatically call the authentication routine and then pass the values straight into the below API calls.
  • CSRF is produced in the same way as TICKET. It’s actually only required when writing data to the API but there is no harm in always including it.
  • HOST is the host or IP address of the Proxmox server.
  • NODE is the node name of the Proxmox server that the LXC Container resides on.
  • TARGET_VM  is the VMID of the LXC Container.
TICKET=[security-ticket]
CSRF=[csrf-token]
HOST=prox-node1
NODE=prox-node1
TARGET_VMID=100

START_TASK_DATA=`curl -s -k -b "PVEAuthCookie=$TICKET" -H "CSRFPreventionToken: $CSRF" -X POST $HOST/api2/json/nodes/$NODE/lxc/$TARGET_VMID/status/start`

START_TASK_RESULT=$(decodeDataFromJson $START_TASK_DATA 'data')

If $START_TASK_RESULT doesn’t come back with null or empty then the command has successfully executed.

Stop an LXC Container

Stopping a VM in Proxmox is very similar to starting one, with just a slight change to the API URL call. All other options are the same as the above section ‘Start an LXC Container’.

TICKET=[security-ticket]
CSRF=[csrf-token]
HOST=prox-node1
NODE=prox-node1
TARGET_VMID=100

STOP_TASK_DATA=`curl -s -k -b "PVEAuthCookie=$TICKET" -H "CSRFPreventionToken: $CSRF" -X POST $HOST/api2/json/nodes/$NODE/lxc/$TARGET_VMID/status/stop`

STOP_TASK_RESULT=$(decodeDataFromJson $STOP_TASK_DATA 'data')

If $STOP_TASK_RESULT doesn’t come back with null or empty then the command has successfully executed.


Parse Proxmox Web API authentication ticket and the CSRFPreventionToken in Bash

Category : How-to

Get Social!

The Proxmox Web API can perform any actions available in the front end Web. By implementing a REST API, all commands have been exposed and can be used programatically.

The API is secured using a token based method which provides a ticket that must accompany all API requests except for the request that generates the token. The token is generated from an API call containing a username, password and security realm.

In this example we’ll use Bash to call the Proxmox Web API, authenticate with the root Proxmox user and parse the response for use in later API requests. Note that it’s not good practice to use the root account for API calls due to the security implications.

See this post for an introduction to the Proxmox Web API.

Add this function to the top of your Bash script. This will be used to parse the JSON using standard Bash calls to obtain the information we need.

decodeDataFromJson(){
    echo `echo $1 \
	    | sed 's/{\"data\"\:{//g' \
	    | sed 's/\\\\\//\//g' \
	    | sed 's/[{}]//g' \
            | awk -v k="text" '{n=split($0,a,","); for (i=1; i<=n; i++) print a[i]}' \
	    | sed 's/\"\:\"/\|/g' \
	    | sed 's/[\,]/ /g' \
	    | sed 's/\"// g' \
	    | grep -w $2 \
	    | awk -F "|" '{print $2}'`
}

The next step is to call the Proxmox API using curl to obtain our authentication token. Use the below script and substitute the values as required:

  • PROX_USERNAME is the username and security realm used to log into the Proxmox Web front end. This must be a valid user with the required permission to make the calls you need.
  • PROX_PASSWORD is the password for the above user. You must escape any special characters as usual in Bash.
  • HOST is the host or IP address of the Proxmox server.
PROX_USERNAME=root@pam
PROX_PASSWORD=PASSWORD
HOST=proxmox-host

DATA=`curl -s -k -d "username=$PROX_USERNAME&password=$PROX_PASSWORD" $HOST/api2/json/access/ticket` 
TICKET=$(decodeDataFromJson $DATA 'ticket')
CSRF=$(decodeDataFromJson $DATA 'CSRFPreventionToken')

And that’s all there is to it! You can use the variables $TICKET and $CSRF in later requests. Keep in mind that a valid ticket is only valid for 2 hours, after that you’ll need to create a new one.


DataStax Cassandra 3.2 Bash Install Script

Get Social!

The below script installs the DataStax distribution of Cassandra 3.2.x and the latest Oracle Java 8 on Debian. Copy and paste the script into a file called install_cassandra.sh and execute it as root.

Change the version 3.2 on line 12 to match the version you’d like to install.

#!/bin/bash
set -e

apt-get update
apt-get install -y wget curl

echo "Installing repos"
echo "deb http://ppa.launchpad.net/webupd8team/java/ubuntu xenial main" | tee /etc/apt/sources.list.d/webupd8team-java.list
echo "deb-src http://ppa.launchpad.net/webupd8team/java/ubuntu xenial main" | tee -a /etc/apt/sources.list.d/webupd8team-java.list
apt-key adv --keyserver hkp://keyserver.ubuntu.com:80 --recv-keys EEA14886

echo "deb http://debian.datastax.com/datastax-ddc 3.2 main" | tee -a /etc/apt/sources.list.d/cassandra.sources.list
curl -L https://debian.datastax.com/debian/repo_key | apt-key add -


echo "Installing binaries"
apt-get update
echo oracle-java7-installer shared/accepted-oracle-license-v1-1 select true | /usr/bin/debconf-set-selections
apt-get install -y oracle-java8-installer datastax-ddc

echo "Complete"

Then connect to the local Cassandra instance run the cqlsh tool.

cqlsh

Connected to Test Cluster at 127.0.0.1:9042.
[cqlsh 5.0.1 | Cassandra 3.2.1 | CQL spec 3.4.0 | Native protocol v4]
Use HELP for help.
cqlsh>


Automated Bash MongoDB 3.2 Install Script for Debian/ Ubuntu

Get Social!

mongodb-logoMongoDB is one of the leading noSQL breeds of database that’s been growing in popularity in recent years. The database is available in a ‘community edition’ that’s available for all to use freely.

The database setup and install is mostly straightforward however there are a few steps you have to take to get a MongoDB instance up and running.

The binaries aren’t shipped by the common Linux distributions so you’ll need to add the apt repositories hosted by mongodb.org. After installing the binaries there are a few config options that can be helpful to start with that are not contained in the default MongoDB install.

First off, create a file on your server called install_mongo.sh and copy the content of the script into it found in the below link.

MongoDB 3.2 Bash Install Script

vi install_mongo.sh

Then make the script executable and run it.

chmod +x install_mongo.sh
./install_mongo.sh

Once the script completes you’ll be able to connect to your MongoDB instance with adminadmin.

mongo admin -u admin -p admin

MongoDB shell version: 3.2.7
connecting to: admin
rs1:PRIMARY>

What the MongoDB install script does

The following is a brief outline of the steps the script takes:

  1. Add the apt repository from mongodb.org and associated key.
  2. Install the full mongo-org package containing these packages: mongodb-org-server, mongodb-org-mongos, mongodb-org-shell, mongodb-org-tools.
  3.  Add a basic config file that:
    1. Enforces the wiredTiger storage engine.
    2. Enables remote access by listening on ALL interfaces.
    3. Enables replication, even if it’s just a stand alone node.
    4. Enables user authentication.
  4. Initiates the server as a replication cluster.
  5. Adds a user for administration called admin with password admin.


Visit our advertisers

Quick Poll

Do you use ZFS on Linux?

Visit our advertisers