Create Your First Docker Container

Create Your First Docker Container

Category : How-to

Get Social!

docker-logoDocker is probably one of the easiest environments to create a virtualised instance based on a number of flavours of operating systems. Rather that having to install an operating system yourself, you can download one of the many guests templates or ‘images’ available directly from the Docker community.

See my blog post on installing Docker on Ubuntu 14.04 if you don’t currently have Docker installed.

There are a number of commands which are required to manage Docker containers and images. First off, let’s see if we have any images in our local Docker library.

$ docker images
REPOSITORY          TAG                 IMAGE ID            CREATED             VIRTUAL SIZE

The docker images command lists the available local images which you can use to create a Docker container. The above output does not show any local images so lets download one from the central Docker repository.

We must choose which image to download and use to create our first Docker container. There are literally thousands of images available on the central repository and all can be downloaded through the docker command. Let’s use the search command to find an image to download.

$ docker search ubuntu

This will display a huge list of all the images available containing the word ubuntu. As you can imagine, there will be hundreds because not only are base OS images available, but customised images containing specific applications or set ups.

Let’s download the basic ubuntu 14.04 image:

$ docker pull ubuntu:14.04
Pulling repository ubuntu
ad892dd21d60: Download complete
511136ea3c5a: Download complete
e465fff03bce: Download complete
23f361102fae: Download complete
9db365ecbcbb: Download complete

You can check this has downloaded the image to your local store with the above docker images command. We will also need to make a note of the image ID so that we can use it to create a container from it.

$ docker images
REPOSITORY          TAG                 IMAGE ID            CREATED             VIRTUAL SIZE
ubuntu              14.04               ad892dd21d60        11 days ago         275.5 MB

The next step is to create a container and make the required changes. Creating a container is Docker is done with the run command followed by, amongst other things, a command to run within the container. We are going to create a new container and use a bash session to customise the container before saving it as a new image for use in the future.

Create the Docker container with the run command and specify the bash shell to be executed on completion. This will leave us with a bash session which we can use the customise the image. Replace the ad892dd21d60 ID with the ID of the image we downloaded in the previous step.

$ docker run -i -t ad892dd21d60  /bin/bash
root@3a09b2588478:/#

You now have an active shell on the container which has been created with the id 3a09b2588478. Type exit to end the session in your guest container and the container will be stopped and kept available on your Docker system.

Run the ps Docker command to see what containers are known to your Docker system.

$ docker ps -a
CONTAINER ID        IMAGE               COMMAND             CREATED             STATUS              PORTS               NAMES
f4b0d7285fec        ubuntu:14.04        /bin/bash           8 minutes ago       Exit 0                                  hungry_thompson
8ae64c0faa34        ubuntu:14.04        /bin/bash           10 minutes ago      Exit 0                                  jovial_hawking
3a09b2588478        ubuntu:14.04        /bin/bash           14 minutes ago      Exit 130                                kickass_lovelace

The above output shows 3 containers which are available in my Docker system with the container ID on the left. We can re-enter one of these containers to make our changes, but first we need to start it. I’m going to use container ID 3a09b2588478 for the rest of this example but yours will be a different ID.

$ docker start 3a09b2588478

We can now attach to the container to create a shell where we can make our modifications.

$ docker attach 3a09b2588478

You now have a shell running on the container which you can use to make your changes to the container. Let’s keep it simple and just run an upgrade with apt-get and then exit. In the real world, you might install an application, or define your configuration such as LDAP SSH login.

$ apt-get update
$ apt-get upgrade
$ exit

The last step in our example is to save the container as a new image which can be used to create future Docker containers. You’ll need to specify the container ID as well as the name of the image to use. You can specify a new image name or overwrite the existing image name.

$ docker commit 3a09b2588478 ubuntu:14.04
b2391f1efa6db419fad0271efc591be11d0a6d7f645c17487ef3d06ec54c6489


And that’s all there is to it! You have created a new Docker container, from one of the images available from Docker, made some changes and saved it locally for future use. Of cause, there are plenty more ways to use Docker, but I hope this has been useful for getting a basic understanding of how Docker works.

Next steps: See my post on using a Dockerfile to automate Docker image creation.

Quick Poll

Are you using Docker.io?

Create a Ubuntu 14.04 OpenVZ Template for Proxmox

Get Social!

proxmox logo gradThe latest Ubuntu long term support is now available, called Ubuntu 14.04.
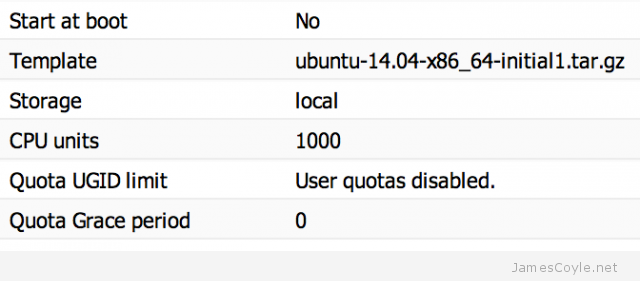
There isn’t currently a template available over on OpenVZ however I’m sure that will be shortly rectified. In the meantime, however, you can use the below steps to create a 14.04 Ubuntu template for OpenVZ/ Proxmox. This template has only been lightly tested so please report any errors as you find them.

This template is BETA, please report any problems in the comments.

Vistit Downloads Page


You can download a pre-created VM from here directly, or you can create your own using the below notes.


Before continuing, this guide assumes that you already have an installation of Ubuntu up and running which you can SSH to. This could be either a KVM or physical machine.

We will use debootstrap to create the template so make sure it’s installed and install it if you haven’t already.

apt-get install -y debootstrap

Use debootstrap to download and configure all the required packages to a temporary directory. For this example, we’ll use /tmp/deb.

debootstrap --arch amd64 trusty /tmp/deb ftp://ftp.ubuntu.com/ubuntu

Copy the below script into the tmp directory of the template root which has just been created. For this example you’ll need to copy the text into this path:

vi /tmp/deb/tmp/client.sh
#!/bin/bash

echo "root:password" | chpasswd

apt-get update

apt-get purge -y console-setup ntpdate whiptail eject ureadahead sudo vim-tiny rsync
apt-get install -y vim openssh-server

find / -name *ondemand -exec rm -rf {} \;
rm -f /etc/init/console* /etc/init/tty*

sed -i -e 's/^\$ModLoad imklog/#\$ModLoad imklog/g' /etc/rsyslog.conf
sed -i -e 's@\(space:\)\(/var/log/\)@\1-\2@' /etc/rsyslog.d/*.conf
sed -i -e 's/^\#cron./cron./g' /etc/rsyslog.d/50-default.conf

sed -i -e 's/^\console output/#console output/g' /etc/init/rc.conf
sed -i -e 's/^\env INIT_VERBOSE/#env INIT_VERBOSE/g' /etc/init/rc.conf

locale-gen en_US.UTF-8
locale-gen en_GB.UTF-8
dpkg-reconfigure locales

cp /usr/share/zoneinfo/Europe/London /etc/localtime

cat <<EOF > /etc/init/tty1.conf
# tty1 - getty
#
# This service maintains a getty on tty1 from the point the system is
# started until it is shut down again.

start on stopped rc RUNLEVEL=[2345]

stop on runlevel [!2345]

respawn
exec /sbin/getty -8 38400 tty1
EOF

rm -f /etc/ssh/ssh_host_*

cat << EOF > /etc/init.d/generate_ssh_keys
#!/bin/bash
ssh-keygen -f /etc/ssh/ssh_host_rsa_key -t rsa -N ''
ssh-keygen -f /etc/ssh/ssh_host_dsa_key -t dsa -N ''
rm -f \$0
EOF

chmod a+x /etc/init.d/generate_ssh_keys
update-rc.d generate_ssh_keys defaults

apt-get clean
find /var/ -name *.log -exec rm -rf {} \;
rm -rf /boot /dev /media /opt /run /srv /tmp /root/.bash_history /root/.viminfo /etc/ssh/ssh_host_*
mkdir /dev /run /tmp
touch /dev/null

exit

Make the script runnable which chmod.

chmod +x /tmp/deb/tmp/client.sh

Run the above script using the chroot command to set up the template.

chroot /tmp/deb /tmp/client.sh

The script will now run and set up the template using /tmp/deb/ as the templates root.

Once completed, create an archive of the template root device and install it on your OpenVZ/ Proxmox server.

cd /tmp/deb
tar -czpf /tmp/ubuntu-14.04-x86_64-initial1.tar.gz .

Copy the /tmp/ubuntu-14.04-x86_64-initial1.tar.gz file to your cache directory of your Proxmox install and create your first Ubuntu 14.04 container!

proxmox-ubuntu-1404-template


Basic OpenVZ Container Management

Category : How-to

Get Social!

OpenVZ containers, or CT for short, work on the premise of using a template as the starting point for each virtual instance. The Template usually holds the basic applications, such as an SSH server, to create a functioning running instance.

See my blog post on Setting up an OpenVZ server for information on creating an OpenVZ server.

Download an OpenVZ Template

OpenVZ hosts a suite of OpenVZ templates for all common Linux distributions. Before you can create a CT you will need to choose a template from the below site and download it to your OpenVZ server. The template must be saved in your servers template directory, by default this is /vz/template/cache.

Download your templates from: http://wiki.openvz.org/Download/template/precreated

I will use the Debian 7 template for this example.

wget -P /vz/template/cache http://download.openvz.org/template/precreated/debian-7.0-x86_64.tar.gz

Create your first OpenVZ container

Most of the administration tasks for a container, such as creating and destroying a container, use the vzctl command.

Before we create our first container we need to understand the components of the create command. This is an example of a basic create command:

vzctl create 200 --ostemplate debian-7.0-x86_64 --config basic
  • 200 is the container ID. This is a unique ID which represents the CT being created. We will use this ID later when we start and stop the machine.  You can use virtually any number, but we usually use a three digit number.
  • –ostemplate is the template file name which we downloaded in the previous section. This file, with a tar.gz extention, must exist in the template directory of your OpenVZ server. By default, the templates directory is /vz/template/cache.
  • –config is what decides how much RAM, disk and other properties the CT will assume. OpenVZ have created some example configurations for us, basic being one of them.

Example:

# vzctl create 200 --ostemplate debian-7.0-x86_64 --config basic 
Creating container private area (debian-7.0-x86_64)
Performing postcreate actions
CT configuration saved to /etc/vz/conf/200.conf
Container private area was created

List available OpenVZ containers

Now that we have created a container, we can list the details with vzlist. Running this command will list all turned on containers so we’ll need the -a switch to list the turned off ones as well.

# vzlist -a
      CTID      NPROC STATUS    IP_ADDR         HOSTNAME
       200          - stopped   -               -

Start/ Stop/ Restart an OpenVZ container

Starting, stopping and restarting a container are done via the vzctl command with either start, stop or restart and the container ID.

vzctl start 200
vzctl stop 200
vzctl restart 200

Configure an OpenVZ container

There are many configuration options for an OpenVZ container which specify disk space, SWAP, networking, CPU and plenty of others. I’ll cover a few basic options here.

Networking is a common option, and something we will need in our OpenVZ container. First lets set the hostname to example.jamescoyle.net.

vzctl set 200 --hostname example.jamescoyle.net --save

Next, let’s add an IP address on the same range as our host. Make sure you check that this IP is free and not already in use by another machine on your network.

vzctl set 200 --ipadd 10.10.10.100 --save

The last part of our basic network configuration is to add some nameservers so that DNS entries can be resolved. I’ll use the Google nameservers for this example but you may also wish to include your own local servers.

vzctl set 200 --nameserver 8.8.8.8 --nameserver 8.8.4.4 --save

Execute commands in an OpenVZ container

Using this current example, we can’t connect to our container because we haven’t set a root password. We need to issue the passwd command inside the container and type a password.

There are two ways to do this. We can enter the container directly from the host which will give us a shell running on the container itself.

vzctl enter 200

You can then issue any further commands you require.

The other option is to run a single command from the host using vzctl exec followed by the command to execute.

# vzctl exec 200 passwd
Enter new UNIX password: mypassword
Retype new UNIX password: mypassword
passwd: password updated successfully

Remove an OpenVZ container

Before you remove an OpenVZ container, you must make sure it is stopped. Once the container is stopped, you can use the vzctl destroy command to delete the container permanently.

vzctl destroy 200

Be careful, there is no confirmation for the destroy command!


Change the Password for an OpenVZ Container

Category : How-to

Get Social!

openvz-logo-150px_new_3If you have forgotten the password for an OpenVZ container – relax! Help is at hand.
Luckily OpenVZ makes it very easy to set or reset the password for any user of a container. You’ll need access to the terminal on the hardware node which is running the container to run a simple vzctl command.

vzctl is the CLI command which is used to configure and control an OpenVZ container. Using the –userpassword switch we can reset a users password. We can also use this command to create a new user if the specified user does not already exist.

vzctl set [VMID] --userpasswd [USER]:[PASSWORD]

Run the above command and substitute the following values for your own:

  • [VMID] is the ID of the container to set the new password on.
  • [USER] is the name of the user that you’d like to change the password for. If this user doesn’t exist then a new user will be created.
  • [PASSWORD] is the password to set for the [USER].

Note: The container needs to be running for this command to work as the user information is saved within the container and not in the containers configuration file like many of the other vzctl commands. If the container is not already running, this command will start it.


iptables in a Ubuntu OpenVZ container

Get Social!

proxmox logo gradIf you need a software firewall to shield containers on a Proxmox stack, you should always use a firewall on the host to decide what traffic is allowed for each container. This brings some obvious benefits such as it’s centrally managed – one configuration location for all containers on the node, and security as a compromised container cannot change firewall settings.

However, in Proxmox 3.0+ you can use iptables in a container which also has it’s own benefits under certain circumstances. For example, you can test firewall rules for a new development container without risking other containers on the same host, and you don’t need to give people access to the host to modify the rules.

I have tried iptables using a Ubuntu 12.04 container template. It works as expected but requires some setup on both the guest container and the Proxmox host.

Setup

Proxmox – steps to perform on the Proxmox host

You will need to enable containers access to the required kernel modules. To do this, edit the vz config file:

vi /etc/vz/vz.conf

And edit the IPTABLES= line as below.

IPTABLES="ipt_REJECT ipt_tos ipt_limit ipt_multiport iptable_filter iptable_mangle ipt_TCPMSS ipt_tcpmss ipt_ttl ipt_length ipt_state"

Make sure the required modules are loaded by running the following in a console window as root:

modprobe xt_state
modprobe xt_tcpudp
modprobe ip_conntrack

 Container – steps to perform in the Ubuntu container

First, you need a console window in the host. Either use the GUI console window or use vzctl enter [VMID] to login to the container.

Install iptables using apt-get.

apt-get install iptables

Any changes you make to iptables, such as adding new rules, will be lost each time the service is restarted. This is obviously not ideal as all the rules will be lost every time the container reboots. To get round this we need to add a script to save the rules each time the network interface goes down, and one to load the rules when the interface starts up.

Create an iptables script to run when the network is started:

vi /etc/network/if-pre-up.d/iptables

And add the below script to load the rules into iptables:

#!/bin/sh
iptables-restore < /etc/iptables.rules
exit 0

And when the network goes down:

vi /etc/network/if-post-down.d/iptables

To save the rules:

#!/bin/sh
iptables-save -c > /etc/iptables.rules
exit 0

After your network is restarted, the current rules will be saved to /etc/iptables.rules. To add new rules, you can edit this file directly and load the settings or you can use the iptables commands to create the rules you require. More about that in my iptables cheat sheet.


How to make a new OpenVZ template from an existing template for Proxmox

Get Social!

openvz-logo-150px_new_3The kind folks over at OpenVZ.org have created a rift of templates which we can use as a starting point for our template. It is possible however, to create your own template from scratch based on your favorite Linux distribution – that will be coming in a later blog post.

The starting point for this blog post is to have downloaded a template and started it up in a container. If you don’t have any templates you can download one from OpenVZ. If you use Proxmox as your hypervisor you can download one via the web gui by clicking on your storage, clicking and finally Templates.

So, as I say, you need to have a container up and running and for this post we are going to assume it is running under the VMID of 100. Make any required changes to the template such as:

  • apt-get update && apt-get upgrade (for Debian based containers).
  • yum update (for anything RedHat).

When you are ready to create the template, turn of the container by using the GUI’s Shutdown button or issuing the command halt in the containers terminal.

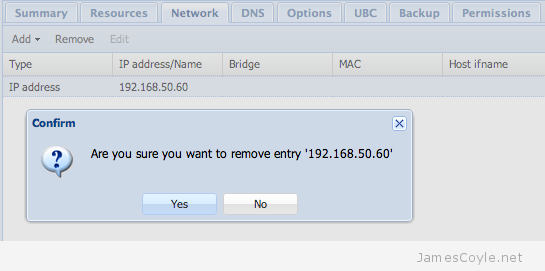
The next thing to do is to remove the network interface. It doesn’t matter if you use veth or venet – just use the web gui and remove the network device. Proxmox container network remove

Once this is complete, login via SSH to the Proxmox server and cd to the root directory of the container. If you have the default setup, this will be /var/lib/vz/private/100.

ssh root@proxmoxserver
cd /var/lib/vz/private/100

Issue the tar command to create the template archive (remember to keep the . on the end, it’s important!). You can change the container template name to anything you like, but I have found it best to conform to the following formula:

operatingsystem-version-archtype-description.tar.gz

tar -cvzpf /var/lib/vz/template/cache/oracle-6-x86_64-intitial.tar.gz .

That’s it! You can now select the container when creating a template from either the GUI or using CLI commands.

I have made a patch for the Proxmox web GUI to add this functionality to the the interface. See my GUI changes blog post for more information.


Visit our advertisers

Quick Poll

Do you use GlusterFS in your workplace?

Visit our advertisers