Create a Simple Cassandra Cluster With 3 Nodes
Category : How-to
 Apache Cassandra™ is a massively scalable open source NoSQL database. Cassandra is built from day 1 to be clustered to tick the usual clustering boxes; no single point of failure, and capacity and throughput scales with cluster size. This guide will look at creating a three node basic cluster within a single data centre.
It is assumed that the following is already in place:
- Cassandra 3.2 is installed on 3 nodes.
- Each node has open communication between the other nodes. Take a look here if you use a firewall between nodes.
- The IP addresses of each node are known.
- No data is stored on the 3 Cassandra instances.
- The default file paths are used, for example from a yum or apt-get install.
Clear existing Cassandra data
If you’ve already started your Cassandra instance you’ll need to stop it and remove the data it contains. The main reason for this is because the cluster_name needs to be the same on all nodes, and it’s best to choose one for yourself rather than use the default Test Cluster.
service cassandra stop
rm -rf /var/lib/cassandra/data/system/*
Set the Cassandra cluster configuration
Cassandra is configured using various files in the /etc/cassandra directory. The cassandra.yaml contains most of the Cassandra configuration, such as ports used, file locations and seed node IP addresses. Edit your cassandra.yaml file and fill in the details as below. The below example is for brevity and your file may contain many other settings.
/etc/cassandra/cassandra.yaml
- cluster_name can be anything chosen by you to describe the name of the cluster. Space is allowed but make sure you wrap everything in quotes. All members of this cluster must have the same name.
- num_tokens is the number of virtual nodes within a Cassandra instance. This is used to partition the data and spread the data throughout the cluster. A good starting point is 256.
- seeds are the IP addresses of the clusters seed servers. Seed nodes are used as known places where cluster information (such as a list of nodes in the cluster) can be obtained. They are not a single point of failure as all active nodes have this information, they are just known locations that can be relied on to have the information when other machines can come and go. It’s recommended that there are 3 seed nodes per data centre.
- listen_address is the IP address that Cassandra will listen on for internal (Cassandra to Cassandra) communication will occur. Cassandra will try to guess your machines IP address if you leave it blank, but it’s best to specify it yourself. This will change on each node.
- rpc_address is the IP address that Cassandra will listen on for client based communication, such as through the CQL protocol. This will change on each node.
- endpoint_snitch is the ‘snitch’ used by Cassandra. A snitch is what tells Cassandra which data center and rack a node belongs to within a cluster. There are various types that could be used here, however describing them is outside the scope of this guide.
Example for node 1:
cluster_name: 'JC Cluster'
num_tokens: 256
seed_provider:
    - class_name: org.apache.cassandra.locator.SimpleSeedProvider
        - seeds: 10.0.0.1, 10.0.0.2
listen_address: 10.0.0.1
rpc_address: 10.0.0.1
endpoint_snitch: GossipingPropertyFileSnitch
Example for node 2:
cluster_name: 'JC Cluster'
num_tokens: 256
seed_provider:
    - class_name: org.apache.cassandra.locator.SimpleSeedProvider
        - seeds: 10.0.0.1, 10.0.0.2
listen_address: 10.0.0.2
rpc_address: 10.0.0.2
endpoint_snitch: GossipingPropertyFileSnitch
Example for node 3:
cluster_name: 'JC Cluster'
num_tokens: 256
seed_provider:
    - class_name: org.apache.cassandra.locator.SimpleSeedProvider
        - seeds: 10.0.0.1, 10.0.0.2
listen_address: 10.0.0.3
rpc_address: 10.0.0.3
endpoint_snitch: GossipingPropertyFileSnitch
Cassandra is built to be fault tolerant and will distribute data to try to minimize the risk of a failure causing loss of data or any downtime. Cassandra therefore has the understanding of a node, a rack and a data centre. Where possible, Cassandra will ensure that the data and it’s backups are stored on a different rack and a different data centre to ensure that failure, even at a data centre level isn’t catastrophic.
Edit the cassandra-rackdc.properties file on each node and set the dc and rack attributes. For this example we’ll assume everything is in the same dc, dc1 however two nodes will be on rack1 and one node will be on rack2. Names are irrelevant, just come up with a naming standard that helps you understand where the Cassandra instance actually is. Everything here is case sensitive so be sure you’re consistent.
vi /etc/cassandra/cassandra-rackdc.properties
Example for node 1:
dc=uk_dc
rack=rack1
Example for node 2:
dc=uk_dc
rack=rack1
Example for node 3:
dc=uk_dc
rack=rack2
Finally, remove the config file cassandra-topology.properties from the etc dir as that’s not used with our configuration.
rm /etc/cassandra/cassandra-topology.properties
Starting your Cassandra cluster
The final steps are to start your cluster and connect to it.
First off, start your seed instances that were specified in the cassandra.yaml config file. Once these are up and running you can start the remaining nodes.
service cassandra start
Once all of your services are started you can use the nodetool status command to check the status of your nodes. Run this from any Cassandra server. As you can see with the below output, all three servers are available in the uk_dc data centre on rack1 and rack2.
nodetool status

Datacenter: uk_dc
===============
Status=Up/Down
|/ State=Normal/Leaving/Joining/Moving
--  Address      Load       Tokens       Owns    Host ID                               Rack
UN  10.0.0.3  124.64 KB  256          ?       bb57bbee-3fe4-47b1-9249-cd3f90cd9718  rack2
UN  10.0.0.2  124.7 KB   256          ?       6669bac4-52c5-49fb-a68a-da065f20ae2c  rack1
UN  10.0.0.1  106.45 KB  256          ?       ddee28dd-7909-4428-bebd-023e4e560db5  rack1

Note: Non-system keyspaces don't have the same replication settings, effective ownership information is meaningless
Connect to your Cassandra Cluster
Once all of your servers have started your cluster is ready to use! Each node will have the cqlsh utility installed that you can use to interact with your Cassandra cluster. You’ll need to use one of the IP addresses Cassandra is listening on (set with rpc_address in cassandra.yaml).
cqlsh 10.0.0.1

Connected to Uptime2 at 10.0.0.1:9042.
[cqlsh 5.0.1 | Cassandra 3.2.1 | CQL spec 3.4.0 | Native protocol v4]
Use HELP for help.
cqlsh>
 There are many alternatives to MySQL that tick some of the boxes you may require. There are plenty of free, open source databases such as PostgreSQL, MogoDB, CouchDB and Apache Derby however many of these databases have a different feature set or are a completely different type of database to the standard MySQL relational data model. Another question is what if I already have MySQL set up in my environment and would like to change? Many people are concerned that the (fairly) recent takeover of Sun Microsystems by Oracle could spell trouble for MySQL.
 MariaDB was created by some of the original developers of MySQL and was created by forking the MySQL code base. It[‘s maintained by the MariaDB Foundation who ensures the free availability of the database software. There are currently 2 main versions of MariaDB available as stable distributions:
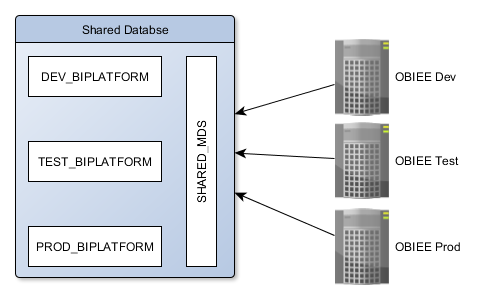
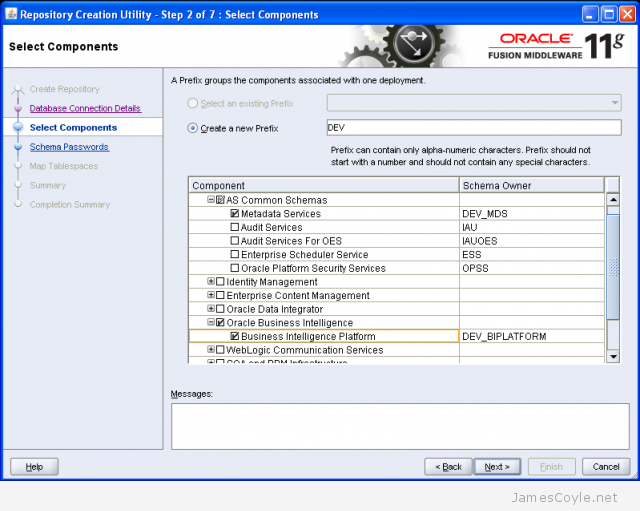
 If you’ve installed OBIEE as many times as I have you’ll be more than familiar with the RCU and the two schemas it creates, MDS and BIPLATFORM. What you may not know, howerver, is that the MDS schema can be shared with multiple installations of OBIEE. A BIPLATFORM schema is still required for each OBIEE environment.
