Download Oracle Java From The Terminal With wget

Download Oracle Java From The Terminal With wget

Get Social!

java-logoOracle have a very restrictive license that applies to most of their software downloads which prohibits you from distributing the binaries yourself. What this means, for example, is that you could not download the Java binaries and upload them to your own APT repository for others to use.

There are a few workarounds that exist to help making this install easier, but here we’re going to look at downloading the Java runtime environment (JRE) binaries and installing them all from a command line.

Use wget to download the binaries, so make sure that’s available on your system. If it isn’t, simply apt-get install wget.

One of the important things to note is that the Java version changes over time and therefore the links and commands below may need to be changed to ensure you’re always getting the latest version. Check out the Java Download Page to make sure you have the latest.

wget --header "Cookie: oraclelicense=accept-securebackup-cookie" http://download.oracle.com/otn-pub/java/jdk/8u51-b16/server-jre-8u51-linux-x64.tar.gz

I’m using an minimal version of Debian that doesn’t have the worlds Certificate Authorities installed and therefore wget gives me an error:

ERROR: cannot verify edelivery.oracle.com's certificate, issued by '/C=US/O=GeoTrust, Inc./CN=GeoTrust SSL CA':
  Unable to locally verify the issuer's authority.
To connect to edelivery.oracle.com insecurely, use `--no-check-certificate'.

The fix is to either install the correct CA certificate on the machine or add the no-check-certificate switch to wget to avoid checking the certificate:

wget --no-check-certificate --header "Cookie: oraclelicense=accept-securebackup-cookie" http://download.oracle.com/otn-pub/java/jdk/8u51-b16/server-jre-8u51-linux-x64.tar.gz

Once you have the Java archive downloaded you’ll need to create a target folder and extract the downloaded archive with tar:

mkdir /opt/jre
tar -zxf server-jre-8u51-linux-x64.tar.gz -C /opt/jre

The last couple of steps are to tell your OS to use the Java binaries you’ve just moved into place.

update-alternatives --install /usr/bin/java java /opt/jre/jdk1.8.0_51/bin/java 1000
update-alternatives --install /usr/bin/javac javac /opt/jre/jdk1.8.0_51/bin/javac 1000

Running anything in Java, or using the -version switch should now use your newly installed binaries.

java -version
java version "1.8.0_51"
Java(TM) SE Runtime Environment (build 1.8.0_51-b16)
Java HotSpot(TM) 64-Bit Server VM (build 25.51-b03, mixed mode)


Create a Ubuntu 14.04 OpenVZ Template for Proxmox

Get Social!

proxmox logo gradThe latest Ubuntu long term support is now available, called Ubuntu 14.04.
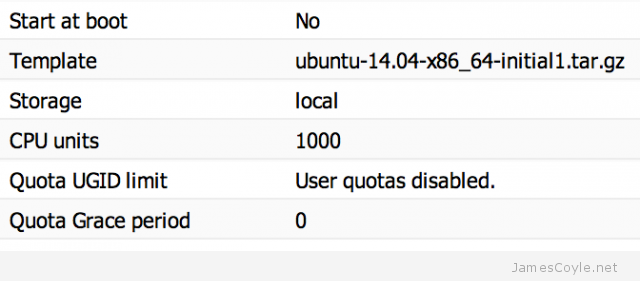
There isn’t currently a template available over on OpenVZ however I’m sure that will be shortly rectified. In the meantime, however, you can use the below steps to create a 14.04 Ubuntu template for OpenVZ/ Proxmox. This template has only been lightly tested so please report any errors as you find them.

This template is BETA, please report any problems in the comments.

Vistit Downloads Page


You can download a pre-created VM from here directly, or you can create your own using the below notes.


Before continuing, this guide assumes that you already have an installation of Ubuntu up and running which you can SSH to. This could be either a KVM or physical machine.

We will use debootstrap to create the template so make sure it’s installed and install it if you haven’t already.

apt-get install -y debootstrap

Use debootstrap to download and configure all the required packages to a temporary directory. For this example, we’ll use /tmp/deb.

debootstrap --arch amd64 trusty /tmp/deb ftp://ftp.ubuntu.com/ubuntu

Copy the below script into the tmp directory of the template root which has just been created. For this example you’ll need to copy the text into this path:

vi /tmp/deb/tmp/client.sh
#!/bin/bash

echo "root:password" | chpasswd

apt-get update

apt-get purge -y console-setup ntpdate whiptail eject ureadahead sudo vim-tiny rsync
apt-get install -y vim openssh-server

find / -name *ondemand -exec rm -rf {} \;
rm -f /etc/init/console* /etc/init/tty*

sed -i -e 's/^\$ModLoad imklog/#\$ModLoad imklog/g' /etc/rsyslog.conf
sed -i -e 's@\(space:\)\(/var/log/\)@\1-\2@' /etc/rsyslog.d/*.conf
sed -i -e 's/^\#cron./cron./g' /etc/rsyslog.d/50-default.conf

sed -i -e 's/^\console output/#console output/g' /etc/init/rc.conf
sed -i -e 's/^\env INIT_VERBOSE/#env INIT_VERBOSE/g' /etc/init/rc.conf

locale-gen en_US.UTF-8
locale-gen en_GB.UTF-8
dpkg-reconfigure locales

cp /usr/share/zoneinfo/Europe/London /etc/localtime

cat <<EOF > /etc/init/tty1.conf
# tty1 - getty
#
# This service maintains a getty on tty1 from the point the system is
# started until it is shut down again.

start on stopped rc RUNLEVEL=[2345]

stop on runlevel [!2345]

respawn
exec /sbin/getty -8 38400 tty1
EOF

rm -f /etc/ssh/ssh_host_*

cat << EOF > /etc/init.d/generate_ssh_keys
#!/bin/bash
ssh-keygen -f /etc/ssh/ssh_host_rsa_key -t rsa -N ''
ssh-keygen -f /etc/ssh/ssh_host_dsa_key -t dsa -N ''
rm -f \$0
EOF

chmod a+x /etc/init.d/generate_ssh_keys
update-rc.d generate_ssh_keys defaults

apt-get clean
find /var/ -name *.log -exec rm -rf {} \;
rm -rf /boot /dev /media /opt /run /srv /tmp /root/.bash_history /root/.viminfo /etc/ssh/ssh_host_*
mkdir /dev /run /tmp
touch /dev/null

exit

Make the script runnable which chmod.

chmod +x /tmp/deb/tmp/client.sh

Run the above script using the chroot command to set up the template.

chroot /tmp/deb /tmp/client.sh

The script will now run and set up the template using /tmp/deb/ as the templates root.

Once completed, create an archive of the template root device and install it on your OpenVZ/ Proxmox server.

cd /tmp/deb
tar -czpf /tmp/ubuntu-14.04-x86_64-initial1.tar.gz .

Copy the /tmp/ubuntu-14.04-x86_64-initial1.tar.gz file to your cache directory of your Proxmox install and create your first Ubuntu 14.04 container!

proxmox-ubuntu-1404-template


Visit our advertisers

Quick Poll

How often do you change the password for the computer(s) you use?

Visit our advertisers