rclone Systemd startup mount script

rclone Systemd startup mount script

Get Social!
rclone

Rclone is a command line utility used for reading and writing to almost any type of cloud or remote storage. From Google Drive to Ceph, rclone supports almost any cloud-based remote storage platform you can think of. You can perform upload, download or synchronisation operations between local storage and remote cloud storage, or between remote storage directly.

In addition to this, rclone has an experimental mount feature that lets a user mount a remote cloud storage provider, such as s3 or Google Drive, as a local filesystem. You can then use the mounted filesystem as if it were a local device, albeit with some performance considerations.

Before we get going, make sure you have rclone installed on your system and configured with a remote. 

curl https://rclone.org/install.sh | sudo bash
rclone config 

Once you have a remote defined, it’s time to create the mountpoint and systemd script. I’ll be using Google Drive for this example, but the mount command works for any supported remote.

Create the mount point directory to use for the remote storage:

mkdir /mnt/google-drive

Next, create the below systemd script and edit it as required:

vi /etc/systemd/system/rclone.service
# /etc/systemd/system/rclone.service
[Unit]
Description=Google Drive (rclone)
AssertPathIsDirectory=/mnt/google-drive
After=plexdrive.service

[Service]
Type=simple
ExecStart=/usr/bin/rclone mount \
        --config=/root/.config/rclone/rclone.conf \
        --allow-other \
        --cache-tmp-upload-path=/tmp/rclone/upload \
        --cache-chunk-path=/tmp/rclone/chunks \
        --cache-workers=8 \
        --cache-writes \
        --cache-dir=/tmp/rclone/vfs \
        --cache-db-path=/tmp/rclone/db \
        --no-modtime \
        --drive-use-trash \
        --stats=0 \
        --checkers=16 \
        --bwlimit=40M \
        --dir-cache-time=60m \
        --cache-info-age=60m gdrive:/ /mnt/google-drive
ExecStop=/bin/fusermount -u /mnt/google-drive
Restart=always
RestartSec=10

[Install]
WantedBy=default.target

The important parts are detailed below, however, there are various other options are detailed on the rclone mount documentation page.

  • –config – the path to the config file created by rclone config. This is usually located in the users home directory.
  • gdrive:/ /mnt/google-drive – details two things; firstly the config name created in rclone config, and secondly the mount point on the local filesystem to use.

Once all this is in place you’ll need to start the service and enable the service at system startup (if required)

systemctl start rclone
systemctl enable rclone

Add systemd Startup Script For CouchDB

Get Social!

couchdb-whiteCurrently, version 2.0 of CouchDB doesn’t come with any form of startup script. I’m sure that as the CouchDB 2 branch becomes more mature and it’s added to the various software repositories startup scripts will be shipped as standard, but until then we have to make do.

The below script is a systemd startup script with a cat command to create the file with the required content in the systemd config directories. Run the below script to create the startup file. You’ll need to change /usr/bin/couchdb to be the location of your couchdb executable.

cat <<EOT >> /etc/systemd/system/couchdb.service
[Unit]
Description=Couchdb service
After=network.target

[Service]
Type=simple
User=couchdb
ExecStart=/usr/bin/couchdb -o /dev/stdout -e /dev/stderr
Restart=always
EOT

You’ll then need to reload the systemd daemon and add the couchdb service to the startup routine. Run the below commands to enable CouchDB at machine startup.

systemctl  daemon-reload
systemctl  start couchdb.service
systemctl  enable couchdb.service


Proxmox OpenVZ Container and KVM Startup and Shutdown Order

Get Social!

proxmox logo gradFrom time to time you will need to shutdown and startup your Proxmox hardware node. There are many reasons for this such as adding new hardware or to apply new kernel updates.
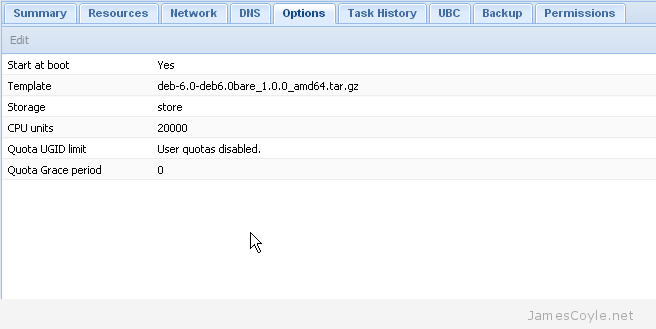
Before you shutdown the hardware node you must cleanly shutdown all OpenVZ containers and all KVMs. To avoid having to do this manually, Proxmox will issue all running containers and VMs the shutdown command as part of the hardware nodes shutdown procedure. Proxmox also gives us the option to specify which containers and VMs should be started when the hardware node is turned on. This means that the final part of the hardware nodes startup sequence will be to start your containers and VMs. Depending on your environment, this may need to be done in a specific order. For example you may wish your database VM or container to be started before your web application.

Enable automatic startup of containers and VMs

To enable the automatic startup of an OpenVZ container or VM you must specify the Start at boot attribute in the Proxmox web interface. Simply click on the Options tab of the container or VM and double click the Start at boot attribute.

proxmox-start-at-boot

Make sure the checkbox is ticked in the new dialogue box which pops up and click OK.

Your container or VM will now automatically be started when your hardware node next starts.

Startup Order for VMs

It is sometimes necessary to specify which containers and VMs startup first and how long the hardware node should wait until issuing the next startup command. This is easy for KVMs as this can be done through the Proxmox web interface.

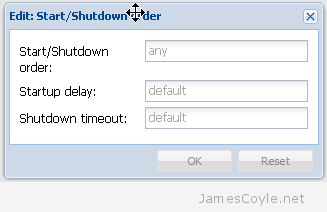
Simply click on the Options tab of the container or VM and double click the Start/Shutdown order attribute.

proxmox-start-shutdown-order

You can specify the following attributes for the KVM:

  • Start/Shutdown order – this is the order the VMs will be started in. For example, setting this to 1 will mean that this VM will be instructed to start first. You can specify the same number for multiple VMs which means that all VMs of the same number will be instructed to start at the same time. The reverse order is used when the machines are automatically shutdown.
  • Startup delay – this is the time in seconds which Proxmox will wait until moving on to the next priority. If you set a VM with a Start/Shutdown order of 1 with a Startup delay of 30, Proxmox will wait 30 seconds until instructing the VM with a Start/Shutdown order of 2 to start.
  • Shutdown timeout – when a VM is asked to shutdown, an ACPI shutdown request is sent to the VM which should initiate the guests shutdown procedure. If ACPI requests are not supported by the guest, or an exception occurs during shutdown the process may not complete. In this case the Proxmox will wait for the Shutdown timeout threshold to pass before forcefully terminate the VM. If no value is specified then the defaults are used which are 60 seconds for Containers and 180 seconds for VMs.

Any VMs which have the Start at boot attribute enabled but no Start/Shutdown order attribute will be started after all VMs with a Start/Shutdown order attribute set have been processed.

Startup Order for OpenVZ Containers

Unfortunately Proxmox has not provided this functionality in the web based GUI for OpenVZ containers. To specify the order for a container we need to use the command line on the Proxmox hardware node.

Login to your Proxmox hardware node as the root user and issue the below command to set the machine startup order. You will need to change [PRIORITY] to the priority value to use and [VMID] to the ID of the container.

vzctl set [VMID] –bootorder [PRIORITY] -save

You can use vzlist if you do not know the [VMID] of the container.

vzlist

CTID      NPROC STATUS    IP_ADDR         HOSTNAME
100       32    running   -               test.jamescoyle.net

You must have already enabled Start at boot for the container to start up. Any containers which have the Start at boot attribute enabled but no Start/Shutdown order attribute will be started after all containers with a Start/Shutdown order attribute set have been processed.


Visit our advertisers

Quick Poll

What type of VPN protocol do you use?

Visit our advertisers