Export and Import a Docker Image Between Nodes

Export and Import a Docker Image Between Nodes

Get Social!

docker-logoOne of the driving forces behind Docker is to create a consistent environment across all Docker enabled machines and to create portable templates, or images, which can be ran on any Docker enabled server.

It would, therefore, make perfect sense that Docker have made it very easy for us to export a running container and re-import it on another Docker server.

Lets assume, for this example, that you have a running container that you would like to move to another host. The summary of the process is to save the container to an image, save it to a tar file, move it to your new host and load the image into the new docker server.

Find the ID of the container that you would like to move.

$ docker ps -a
CONTAINER ID        IMAGE               COMMAND             CREATED             STATUS              PORTS               NAMES
f4b0d7285fec        ubuntu:14.04        /bin/bash           38 minutes ago      Exit 0                                  hungry_thompson
8ae64c0faa34        ubuntu:14.04        /bin/bash           41 minutes ago      Exit 0                                  jovial_hawking
3a09b2588478        ubuntu:14.04        /bin/bash           45 minutes ago      Exit 0                                  kickass_lovelace

I’m going to use the above 3a09b2588478 ID for this example.

Commit your changes and save the container to an image called mynewimage.

$ docker commit 3a09b2588478 mynewimage
4d2eab1c0b9a13c83abd72b38e5d4b4315de3c9967165f78a7b817ca99bf191e

Save the mynewimage image to a tar file. I will use the /tmp/ directory to save the image but you could easily use a NFS share to make it easier to move the completed tar file.

$ docker save mynewimage > /tmp/mynewimage.tar

Copy the mynewimage.tar file to your new Docker instance using whatever method works in your environment, for example FTP, SCP, etc.

Run the docker load command on your new Docker instance and specify the location of the image tar file.

$ docker load < /tmp/mynewimage.tar

Finally, run the docker images command to check that the image is now available.

$ docker images
REPOSITORY          TAG                 IMAGE ID            CREATED             VIRTUAL SIZE
mynewimage          latest              4d2eab1c0b9a        5 minutes ago       278.1 MB
ubuntu              14.04               ad892dd21d60        11 days ago         275.5 MB
<none>              <none>              6b0a59aa7c48        11 days ago         169.4 MB
<none>              <none>              6cfa4d1f33fb        7 weeks ago         0 B

Create a Ubuntu 14.04 OpenVZ Template for Proxmox

Get Social!

proxmox logo gradThe latest Ubuntu long term support is now available, called Ubuntu 14.04.
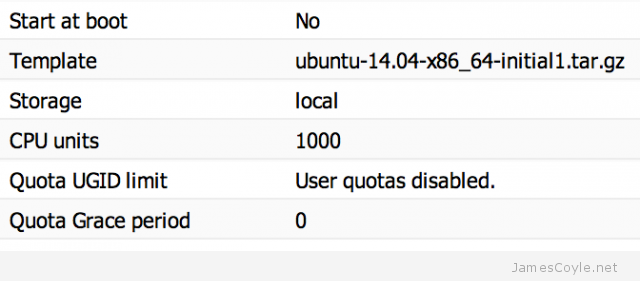
There isn’t currently a template available over on OpenVZ however I’m sure that will be shortly rectified. In the meantime, however, you can use the below steps to create a 14.04 Ubuntu template for OpenVZ/ Proxmox. This template has only been lightly tested so please report any errors as you find them.

This template is BETA, please report any problems in the comments.

Vistit Downloads Page


You can download a pre-created VM from here directly, or you can create your own using the below notes.


Before continuing, this guide assumes that you already have an installation of Ubuntu up and running which you can SSH to. This could be either a KVM or physical machine.

We will use debootstrap to create the template so make sure it’s installed and install it if you haven’t already.

apt-get install -y debootstrap

Use debootstrap to download and configure all the required packages to a temporary directory. For this example, we’ll use /tmp/deb.

debootstrap --arch amd64 trusty /tmp/deb ftp://ftp.ubuntu.com/ubuntu

Copy the below script into the tmp directory of the template root which has just been created. For this example you’ll need to copy the text into this path:

vi /tmp/deb/tmp/client.sh
#!/bin/bash

echo "root:password" | chpasswd

apt-get update

apt-get purge -y console-setup ntpdate whiptail eject ureadahead sudo vim-tiny rsync
apt-get install -y vim openssh-server

find / -name *ondemand -exec rm -rf {} \;
rm -f /etc/init/console* /etc/init/tty*

sed -i -e 's/^\$ModLoad imklog/#\$ModLoad imklog/g' /etc/rsyslog.conf
sed -i -e 's@\(space:\)\(/var/log/\)@\1-\2@' /etc/rsyslog.d/*.conf
sed -i -e 's/^\#cron./cron./g' /etc/rsyslog.d/50-default.conf

sed -i -e 's/^\console output/#console output/g' /etc/init/rc.conf
sed -i -e 's/^\env INIT_VERBOSE/#env INIT_VERBOSE/g' /etc/init/rc.conf

locale-gen en_US.UTF-8
locale-gen en_GB.UTF-8
dpkg-reconfigure locales

cp /usr/share/zoneinfo/Europe/London /etc/localtime

cat <<EOF > /etc/init/tty1.conf
# tty1 - getty
#
# This service maintains a getty on tty1 from the point the system is
# started until it is shut down again.

start on stopped rc RUNLEVEL=[2345]

stop on runlevel [!2345]

respawn
exec /sbin/getty -8 38400 tty1
EOF

rm -f /etc/ssh/ssh_host_*

cat << EOF > /etc/init.d/generate_ssh_keys
#!/bin/bash
ssh-keygen -f /etc/ssh/ssh_host_rsa_key -t rsa -N ''
ssh-keygen -f /etc/ssh/ssh_host_dsa_key -t dsa -N ''
rm -f \$0
EOF

chmod a+x /etc/init.d/generate_ssh_keys
update-rc.d generate_ssh_keys defaults

apt-get clean
find /var/ -name *.log -exec rm -rf {} \;
rm -rf /boot /dev /media /opt /run /srv /tmp /root/.bash_history /root/.viminfo /etc/ssh/ssh_host_*
mkdir /dev /run /tmp
touch /dev/null

exit

Make the script runnable which chmod.

chmod +x /tmp/deb/tmp/client.sh

Run the above script using the chroot command to set up the template.

chroot /tmp/deb /tmp/client.sh

The script will now run and set up the template using /tmp/deb/ as the templates root.

Once completed, create an archive of the template root device and install it on your OpenVZ/ Proxmox server.

cd /tmp/deb
tar -czpf /tmp/ubuntu-14.04-x86_64-initial1.tar.gz .

Copy the /tmp/ubuntu-14.04-x86_64-initial1.tar.gz file to your cache directory of your Proxmox install and create your first Ubuntu 14.04 container!

proxmox-ubuntu-1404-template


Add Create OpenVZ Template to the Proxmox Web GUI

Get Social!

proxmox logo gradCreating a template from an OpenVZ container is a very manual process. My biggest problem is that you have to have root access to the Proxmox hardware node in order to create a tar from the root of the CT. See How to make a new OpenVZ template for more information on manually creating a template.

proxmox-create-template-context-menu

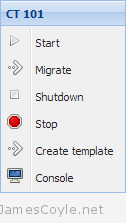
I created a small code patch for the Proxmox API and web GUI to add a ‘create template’ feature for CTs. The code adds a context menu entry when you right click on a CT in the Proxmox web GUI.

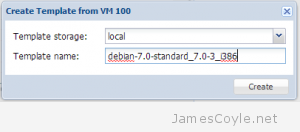
Before using the feature, the CT must be shut down and any network interfaces removed. The feature presents the user with a dialogue box requesting which storage device the template should be saved to, and what it should be called.

Once the storage has been selected and the template has been given a name, a new ‘create template’ task is created which archives the root directory of the selected container and adds it to the cache folder of the selected storage.

proxmox-create-template-dialogue-box

The changes were declined by the Proxmox team on the grounds that creating a template is a technical process and may not result in creating a working, cloned instance. In addition, it is very easy to leave sensitive information in the CT which is the source of the template – all data on the CTs file system will be archived into the template making it available the next time a CT is created. If SSH keys are left on the CT, for example, then they will be available in the new CT also.

Because the feature was not accepted into the main distribution of Proxmox, I will maintain it myself and manually apply the patches to my Proxmox servers after every update. I have created a public repository on my Gitlab server that holds the git patch file which is available for everyone. 

If you accepts the risks mentioned above, and are happy to hack away at your Proxmox binaries, then you are welcome to try the patch for yourself.

You can download the patch and get more information on my public Proxmox Github page.

I should mention that this patch may not always be up to date. In addition, this is changing the actual Proxmox distribution files and as such may have unintended side effects. Please use these patches with caution and only in your development environments.

gitlabDownload


How to make a new OpenVZ template from an existing template for Proxmox

Get Social!

openvz-logo-150px_new_3The kind folks over at OpenVZ.org have created a rift of templates which we can use as a starting point for our template. It is possible however, to create your own template from scratch based on your favorite Linux distribution – that will be coming in a later blog post.
The starting point for this blog post is to have downloaded a template and started it up in a container. If you don’t have any templates you can download one from OpenVZ. If you use Proxmox as your hypervisor you can download one via the web gui by clicking on your storage, clicking and finally Templates.

So, as I say, you need to have a container up and running and for this post we are going to assume it is running under the VMID of 100. Make any required changes to the template such as:

  • apt-get update && apt-get upgrade (for Debian based containers).
  • yum update (for anything RedHat).

When you are ready to create the template, turn of the container by using the GUI’s Shutdown button or issuing the command halt in the containers terminal.

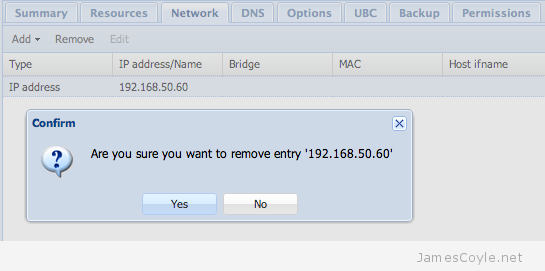
The next thing to do is to remove the network interface. It doesn’t matter if you use veth or venet – just use the web gui and remove the network device. Proxmox container network remove

Once this is complete, login via SSH to the Proxmox server and cd to the root directory of the container. If you have the default setup, this will be /var/lib/vz/private/100.

ssh root@proxmoxserver
cd /var/lib/vz/private/100

Issue the tar command to create the template archive (remember to keep the . on the end, it’s important!). You can change the container template name to anything you like, but I have found it best to conform to the following formula:

operatingsystem-version-archtype-description.tar.gz

tar -cvzpf /var/lib/vz/template/cache/oracle-6-x86_64-intitial.tar.gz .

That’s it! You can now select the container when creating a template from either the GUI or using CLI commands.

I have made a patch for the Proxmox web GUI to add this functionality to the the interface. See my GUI changes blog post for more information.


Visit our advertisers

Quick Poll

Do you use GlusterFS in your workplace?

Visit our advertisers